1. Project management and documentation#
The first module of this course focuses on documentation, which is precisely what I’m doing. Documentation is simple: it’s a summary of what you’ve learned during the course. It’s also a simple yet effective way to remember what you’ve learned and, most importantly, to share your knowledge with others.
1.1. First class#
First, I’d like to share a little bit about the dynamics of our first meeting, so it’s documented. During the first class, we had the opportunity to meet and connect with students from various schools, such as Polytechnic, Computer Science, Biology, etc. This was very enriching and allowed me to communicate more easily and ask for help afterward. Although most of the class was held in French (a language I don’t speak), I was able to count on most of the group to translate the instructions into English so I could follow the class as best as possible. Thank you for that! 😊
1.2. Second class#
For the second class session we were given an assignment which was:
- Build a personal site in the class archive that describes us.
- Document our learning path for this module.
This was done with the help of GitLab, which is a popular software development platform that helps teams plan, build, deliver, and maintain applications efficiently and collaboratively.
1.2.1. SSH keys#
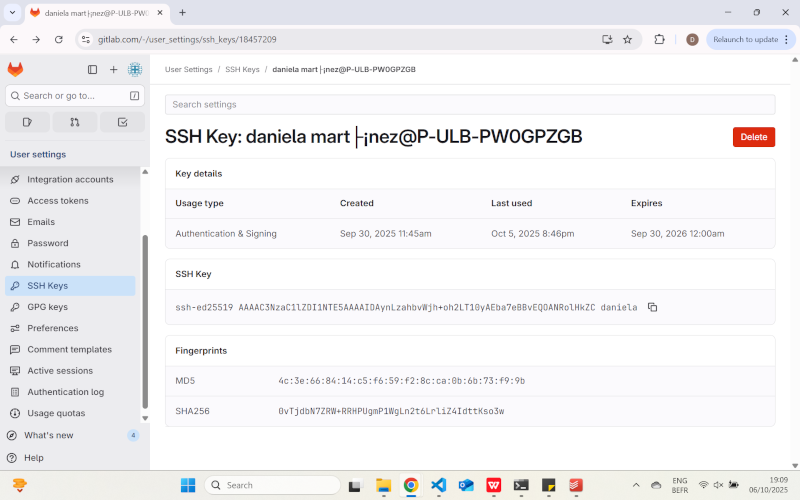
For this first assignment, we were advised to start by connecting our local computer to the remote server in a secure way using SSH keys. The steps were as follows:
1) Install GitLab 2) Install Git Bash 3) Configure Git 4) Configure SSH keys
I already knew the first three steps, since this isn’t my first time using Git. But they can be easily done by following [this tutorial] (https://gitlab.com/fablab-ulb/enseignements/2020-2021/fabzero/basics/-/blob/master/documentation.md#version-control-git-gitlab).
Despite having worked with Git before, I always did so without configuring my SSH key (not recommended). So for this step, I followed the path described in this section: How to generate an SSH key pair.
I got the keys. I entered the public key in GitLab SSH keys tab (the private key shouldn’t be shared) and that’s it!:
1.2.2. Project cloning#
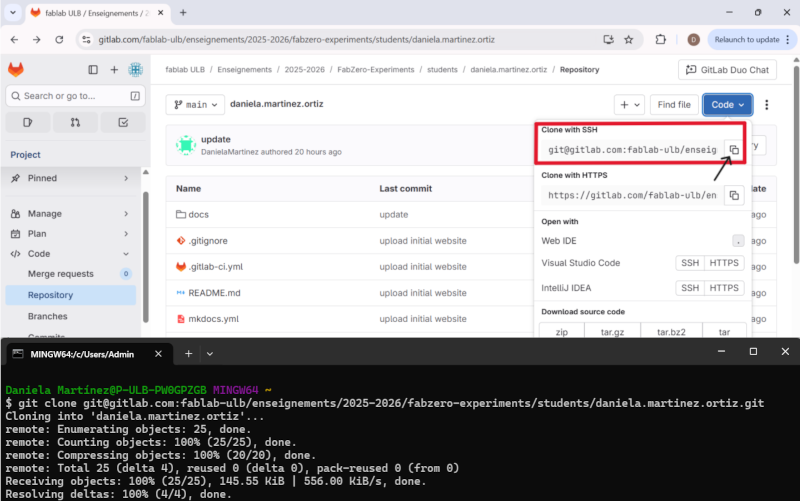
Once the connection was secure, I was able to clone my project to my computer to work directly on the local version. This was accomplished using the git clone command line followed by the URL from the GitLab page of my project, as shown below:
1.2.3. Important commands#
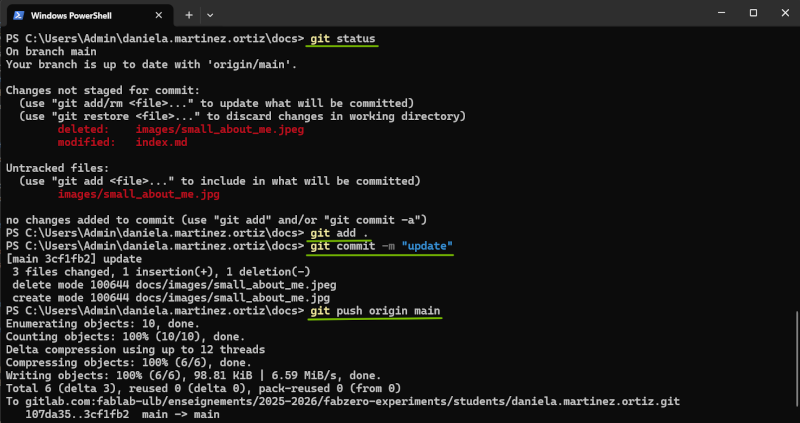
To synchronize changes made to the GitLab server, you need to use some basic commands:
| Command | Purpose |
|---|---|
| git status | this command tells you what you have done since the last commit. It helps you recapitulate your work but is also very useful to make sure you’re not committing anything that you don’t want. If there are some files that you don’t want to commit, you can use .gitignore but I would suggest reading the online doc on that since it is very clear. Don’t be afraid to use this command in between every other steps if you want to be sure of what you’re actually doing |
| git add . | is the command line to add all your directories and files to your repository. The -A tells it that you want “All”. Another way to omit some of your files would be to manually add everything you want (instead of using -A) and so you just wouldn’t add the ones you don’t want |
| git commit -m “text” | is the command to commit your changes to the repository. The -m let’s you write a message in between quotes “test” so you can remember what you have changed with this commit. It is very helpful in case you need to go back in time to a previous commit (for bug fixing for example) |
| git push origin main | simply pushes everything you committed to your repository |
An example of the use of these commands is shown in the following figure:
1.2.4. My workflow#
To present this documentation in web format, you can write it in HTML (unconvenient and difficult to read) or in Markdown (easier to use and read).
To write documentation in Markdown, you need a text editor. The one I’ve been using for years is Visual Studio Code and my working space always look like that on it:
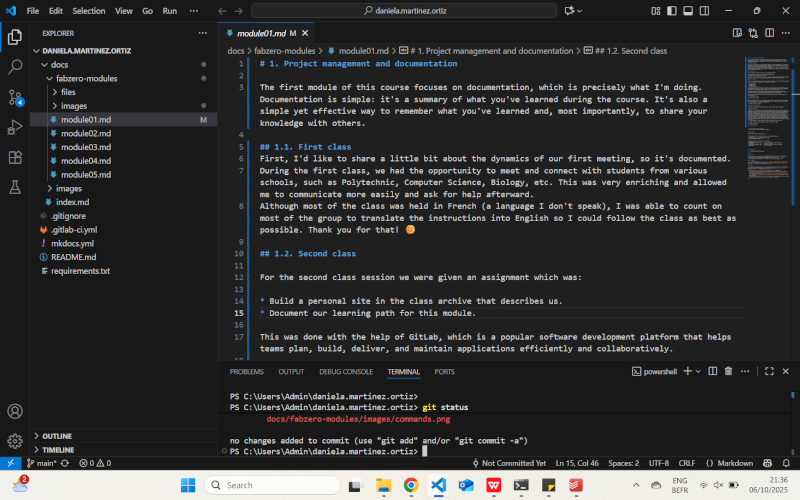
On the left side, I can browse my folders and files. Then, I split the screen into two parts: the bottom one is the terminal, and the top one is where I open the files I’m working on.
1.2.5. Image manipulation#
There are several software for images manipulation(compression,modification,resize). In particular I use the following:
- Gimp
- FFmpeg
Gimp#
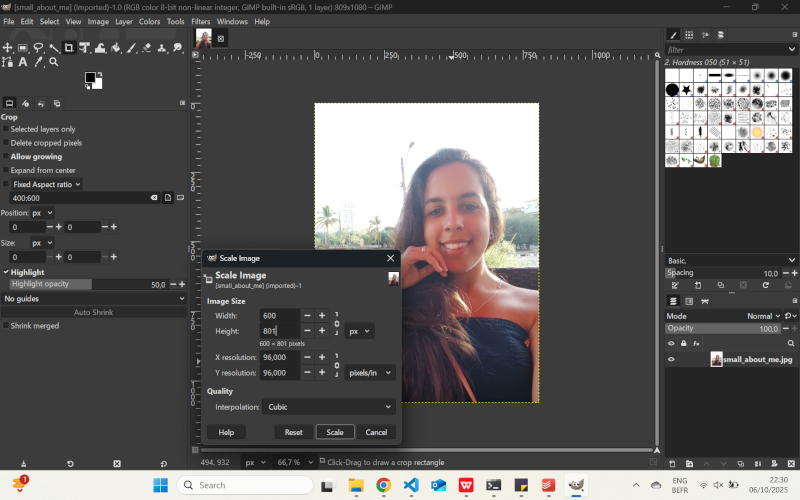
This week I have downloaded and installed the Gimp software, which is an opensource version of photoshop. Gimp is really useful to resize images and it has a simple graphic interface. I have followed the instructions and the tutorial on the [Gimp site] (https://www.gimp.org/tutorials/).
FFmpeg#
It is an interesting feature to reduce the size of your videos. It can be installed via the code:
sudo apt install ffmpeg
I have used it to compress videos via the following command:
ffmpeg -i input.mp4 -vcodec libx265 -crf 28 output.mp4
1.2.6. The principles of project management#
For this project, I’ve been learning about [project management principles] (https://gitlab.com/fablab-ulb/enseignements/fabzero/basics/-/blob/main/project-management-principles.md).
For me, using small deadlines works best; it allows you to avoid overthinking and to see the project’s progress. I use spiral development to focus on the basics and not waste time anticipating everything (although with serial development, you have to anticipate a little and keep some perspective). Making small changes like As-You-Work allows you to get down to business and get the work flowing.
1.2.7. Issues#
The issues tool was implemented by uploading a .csv file that already contained the procedures the students had to follow to complete their work. Once applied to our GitLab environment, it was quite intuitive to mark the tasks completed and understand what steps to take next.
As we complete the tasks in each module, we will update their development until they are all finished.
Check-list#
- [X] made a website and describe how you did it
- [X] introduced yourself
- [X] documented steps for uploading files to the archive
- [X] documented steps for compressing images and keeping storage space low
- [X] documented how you are going to use project management principles
- [X] pushed to the class archive