3. 3D printing#
3.1. Before class#
3.1.1. PrusaSlicer#
To begin the 3D printing process, the first step is to download and install the PrusaSlicer software. You’ll find all the instructions for Windows, Linux, and macOS at this link. PrusaSlicer is a 3D file slicing logic package built into the open-source Slic3r project that converts a model into instructions usable with a 3D printer. To better understand the 3D printing process and how to use the software, follow this tutorial.
3.1.2. Preparation#
Once we enter the application, we need to choose the type of printer that we will use for our work.
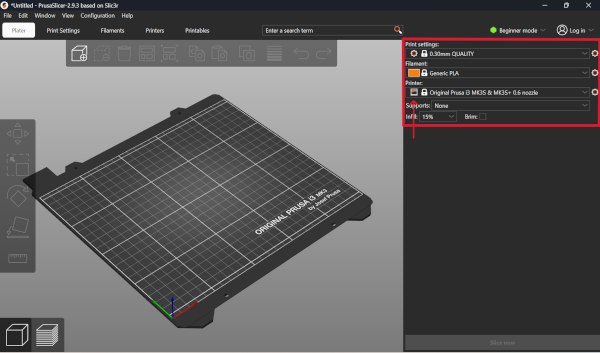
In the red section, click “Printer -> Add/Remove Presets,” search for Prusa Research, and select the one we’ll use for printing. We can also choose the filament based on the material properties and print settings. In my case, I selected “0.20 mm DETAIL” because it offers a good balance between quality and print speed. Finally, in the green section, we have the button to add the file of the object we want to print. We need an STL file that we can export from OpenSCAD.
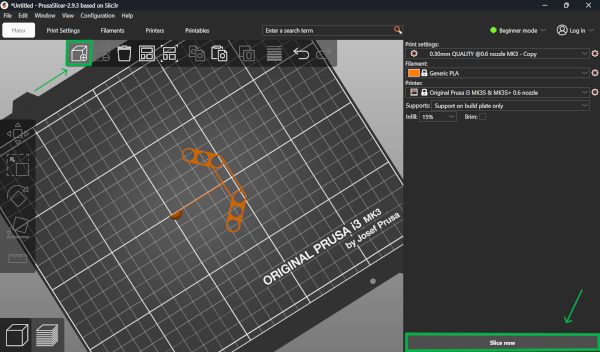
After adding our FlexiLink, click “Slice Now” to proceed to the final step of exporting the G-CODE file. In my case, I need a support for my FlexiLink, which can be added according to our needs in the red section I mentioned above.
3.2. Fourth class#
This week we identified the advantages and limitations of 3D printing. We also learned how to apply design methods and production processes using 3D printing.
3.2.1. Printing#
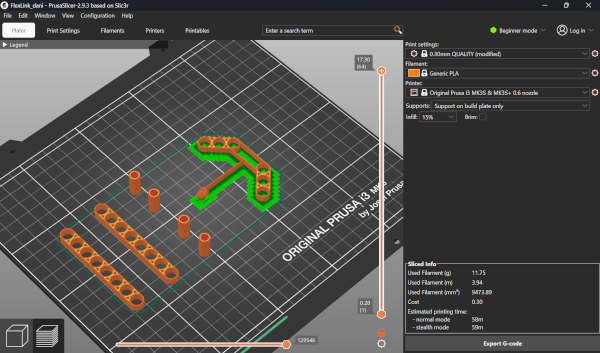
Every printer has an SD card that we need to use. We insert the SD card into our computer and load the exported G-CODE file. Now that the SD card contains our G-CODE, we reinsert it into the printer and we can start printing. After following these steps, I printed a portion of my FlexiLink. After verifying that I didn’t need to make any parameter adjustments, I moved on to printing the rest of the parts. All parts were exported as STL files and loaded into PrusaSlicer for printing.
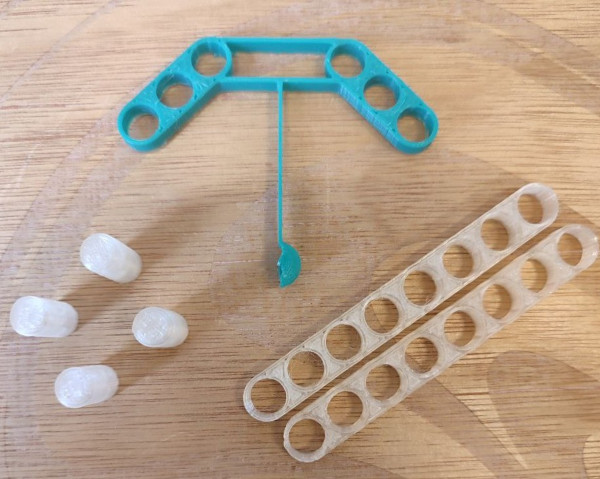
The original part design (.scad) and STL files can be found on this link.
3.2.2. Result#
The idea was to make a type of catapult, based on the basic idea of the satellite beam. You can see the result below.
Check-list#
- [X] explained what you learned from testing the 3D printers
- [X] explained how you have identified your design parts parameters
- [X] shown how you made your kit with words/images/screenshots
- [X] included your original design files for 3D printing (both CAD and generic (STL, OBJ or 3MF) files)
- [X] Included images and description of your working mechanism